It is not so difficult to turn your Raspberry into a media center. Installing OSMC is rather straight forward on Raspberry Pi. You just download the image from OSMC website, write it to an SD card, boot your Raspberry from the SD card and that’s it. However, getting a remote working for your OSMC media center working proved to be rather challenging. This post is to record what I’ve learned from the internet in order to get a working remote.
What you need:
- Raspberry Pi running OSMC;
- IR Receiver (I’m using VS1838B, shown below);

- Any IR remote with enough buttons;
- A computer to access OSMC remotely;
Now, 3 steps to put all the things to together and have them work correctly.
- Get Connected – This will complete the physical connection;
- OSMC configuration – This will help the operating system work with the IR receiver;
- Lircd configuration – This help the system recognize your remote.
Update: As of today(1st of Dec., 2018), OSMC includs Xiaomi remote in their configuration library. So if you want to use a Xiaomi remote, you don’t have to record anything in the 3rd step, the system already has the configuration file.
Get Connected
The IR receiver receives inf-rad signal from the remote. According to its product datasheet, here’s how VS1838B works:

So if you hold the receiver with the big X towards you, its left leg is the signal, its center leg is the ground and its right leg should connect to a power source. The data sheet also specified that the receiver needs a 3.3V power source.
Now, on the Raspberry side, we can use the GPIO port for to connect the receiver. According to Raspberry Pi data sheet, here’s the GPIO pin layout:
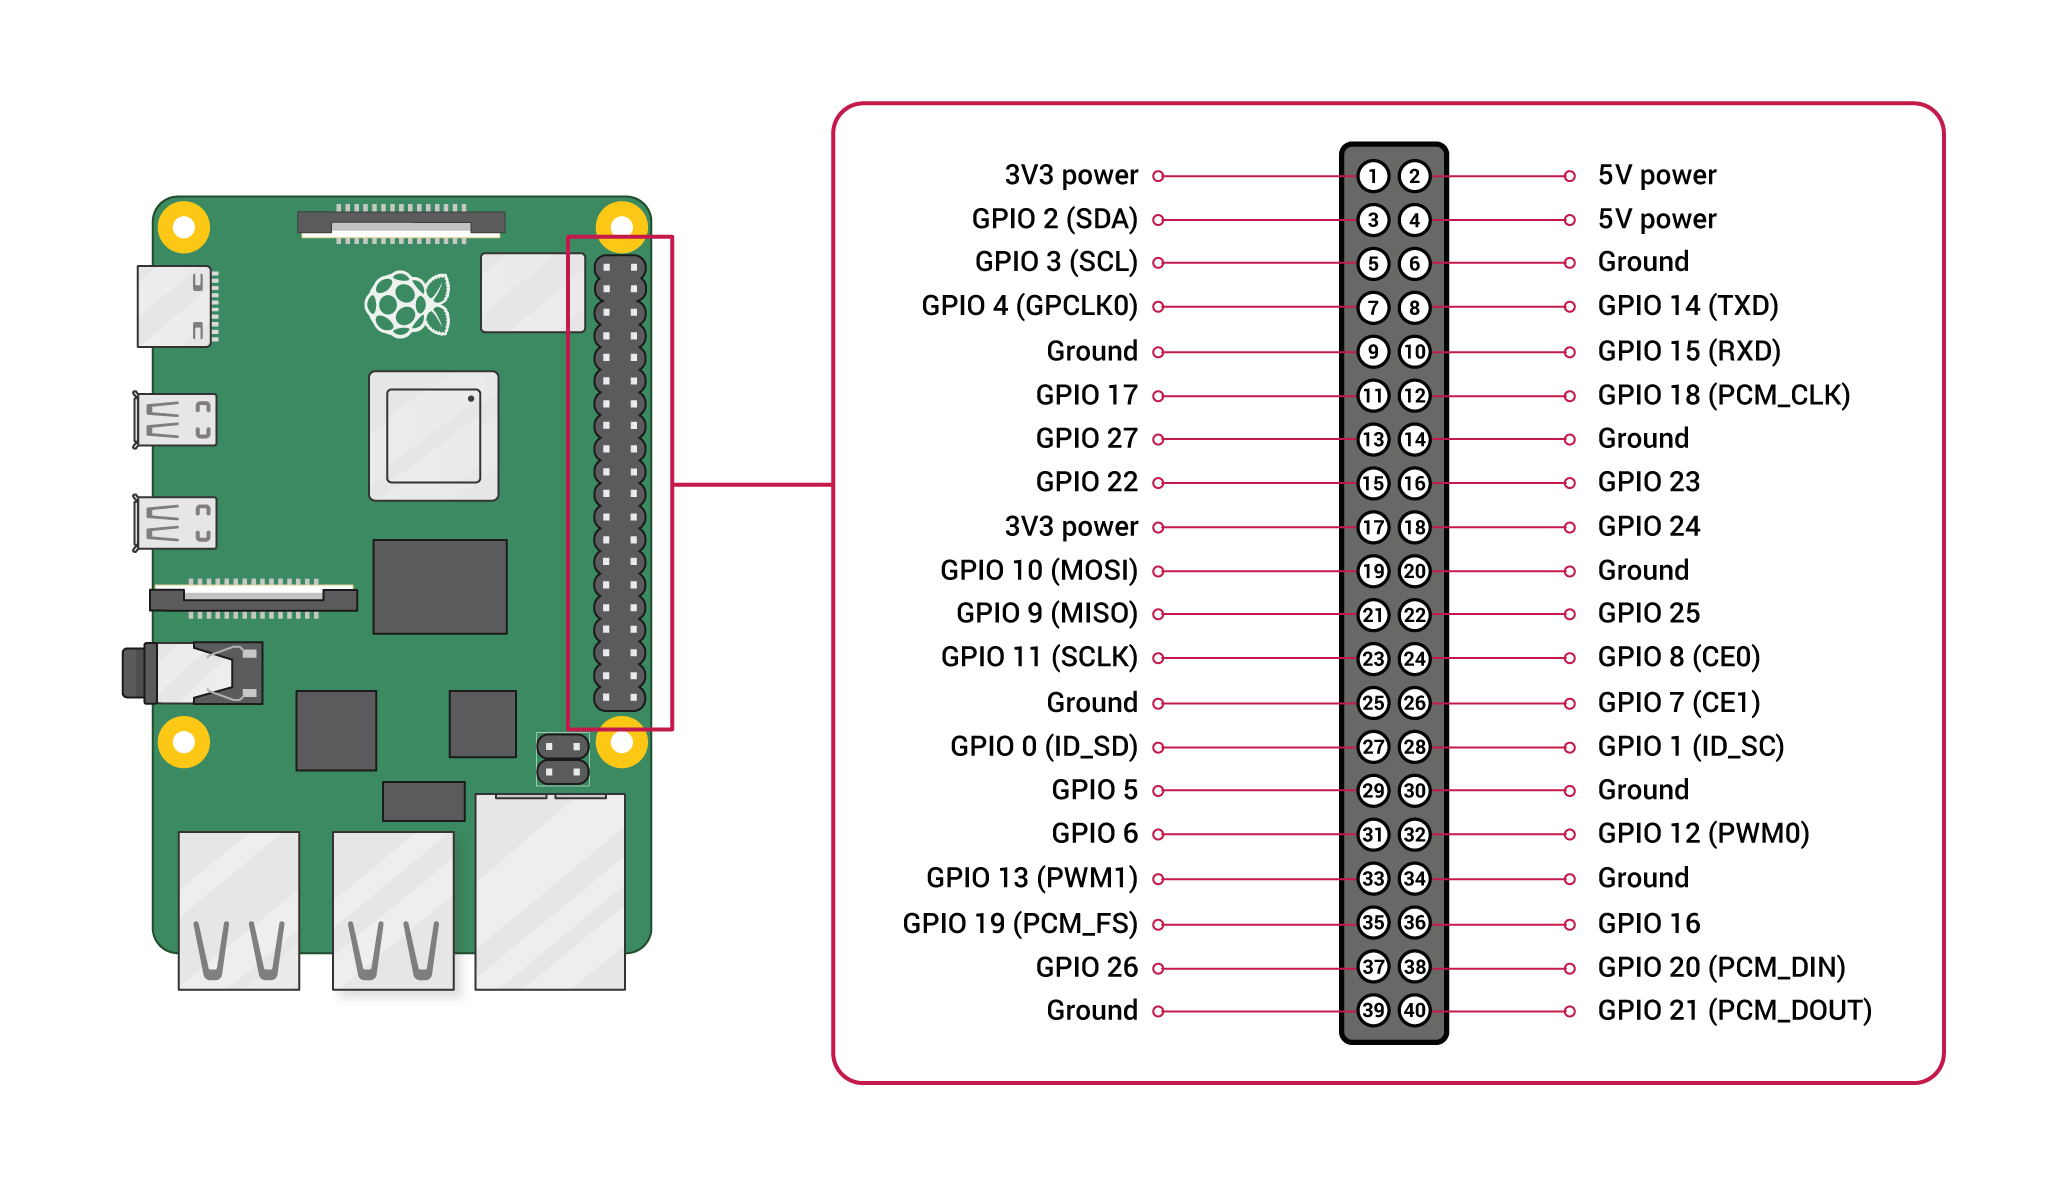
Don’t get confused. All 40 pins numbered from 1 to 40 are for GPIO purpose. However, not all of them are for data. Some are power source, some are ground pins. For our purpose, we just need 1 3.3V power source, 1 ground and 1 for data.
So, we can use pin1 for 3.3V power source, pin6 for ground. As for the output of the receiver, any GPIO data pin should work. But the OSMC community tends to use GPIO17 or GPIO18 in their guidelines, I’m using GPIO 18 – That’s PIN12.
So here is how they should be connected:

OSMC Configuration
Now that the physical connection is there, if everything works as expected, when you press a button on your remote with it pointing to the IR receiver, the receiver will receive signal and sending signal to Raspberry Pi. But nothing happens, because the operating system (OSMC in this case) doesn’t know how to handle this signal. (As a matter of face, it doesn’t even know which PIN are you using to receive signal yet.) We have to change that.
In order for OSMC to be aware of our setup, we have to tell it to, 1st listen to GPIO18 for signal, and 2nd enable lircd to handle inf-rad input. Luckily, the 2 steps can be done in 1 place.
Power up your Raspberry media center, using a keyboard to navigate to “Settings->System Info”, note down your IP address. Now you need another computer to logon to your media center remotely.
You should be able to logon to your media center using SSH with username “osmc”. If you’ve never changed the password (You should!), the default password is “osmc”.
Once logged on, you can edit the file /boot/config.txt to add the following line:
dtoverlay=gpio-ir,gpio_pin=18
Save the file, and reboot Raspberry Pi.
Update: In newer version of OSMC, this can be achieved by going to “My OSMC, Pi Config, Hardware Support”:
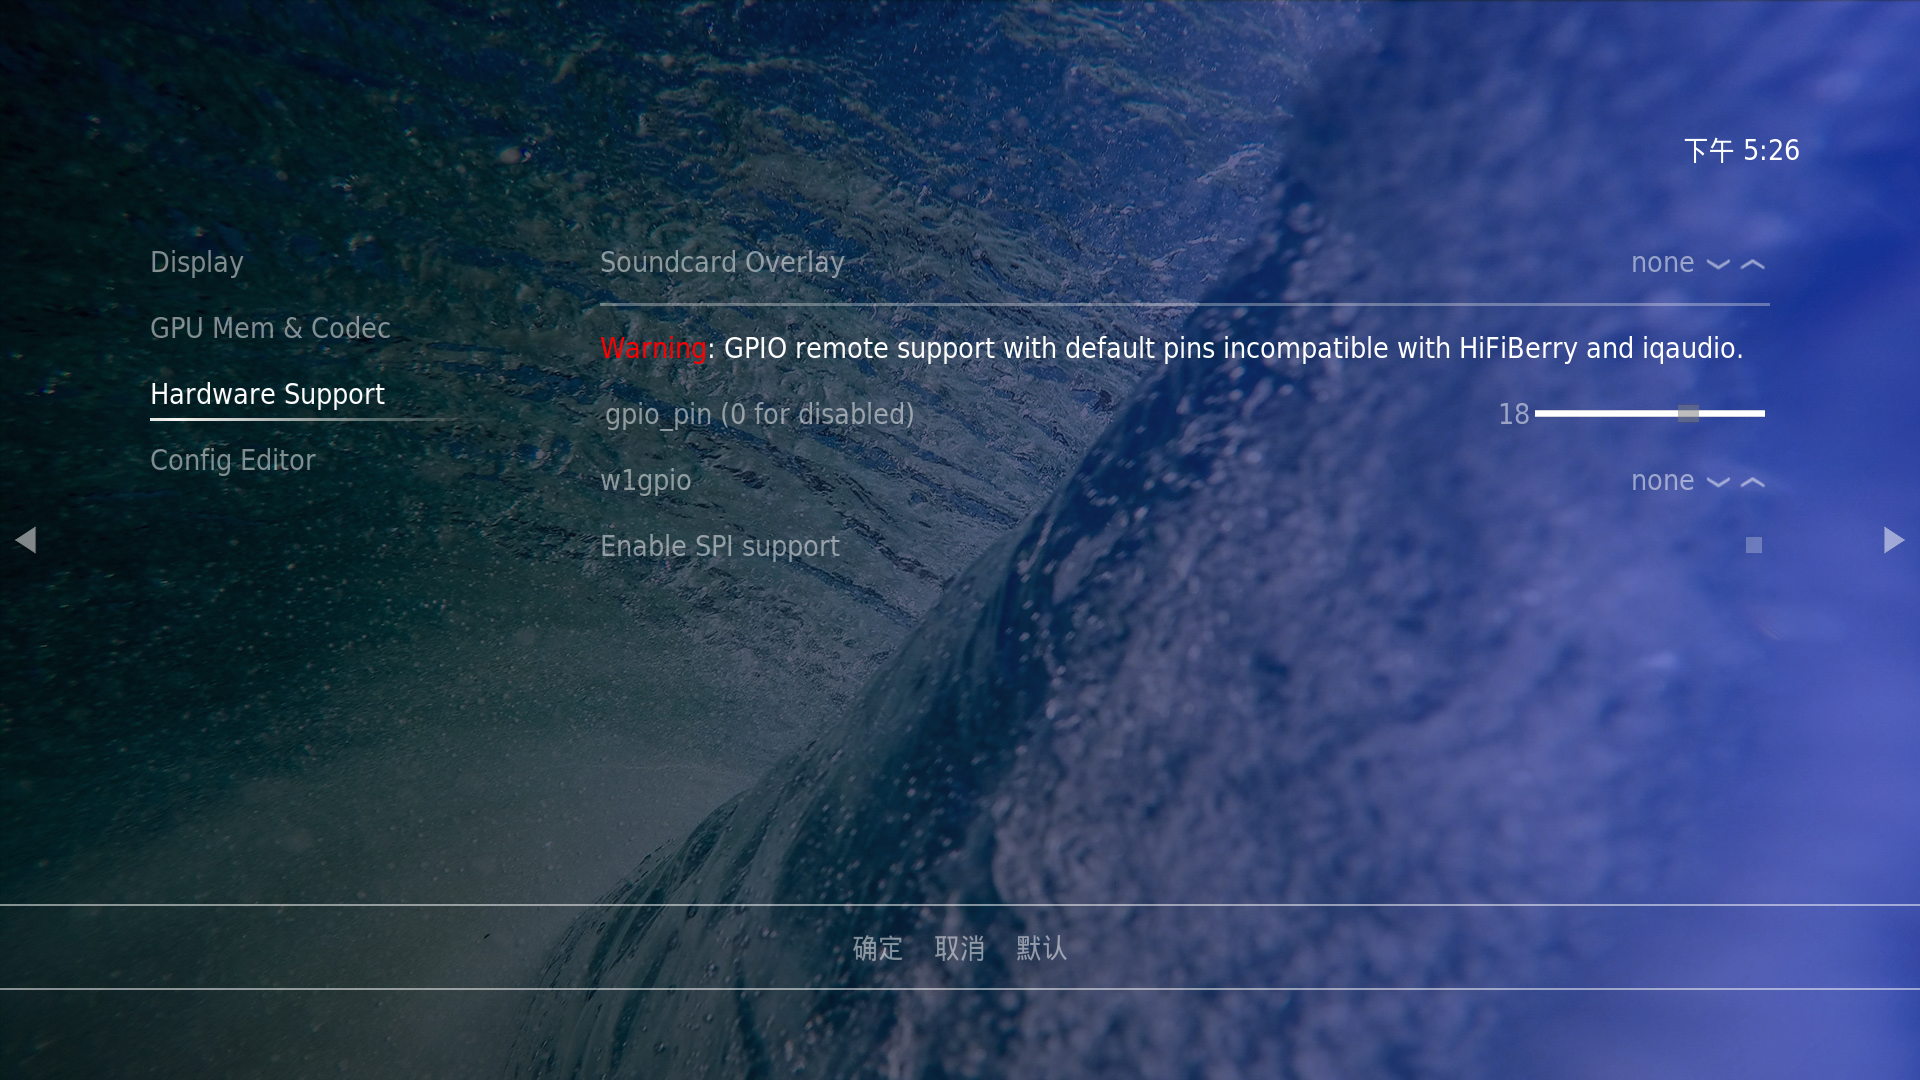
So you don’t have to do the remote logon, file editing, etc. But don’t forget to reboot your Raspberry after saving the configuration. And, you still have to logon remotely in the next steps.
Verify the setup
Now that your OSMC should be able to receive signals from remote controller. This can be verified by the following steps:
- Logon to your osmc via SSH as osmc.
- Disable lircd service to avoid possible interference.
- Run the following command:
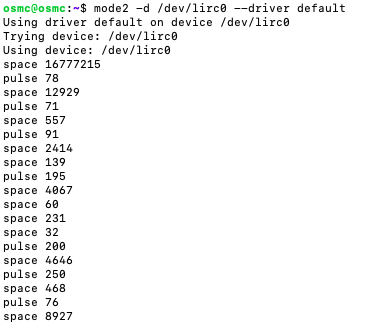
mode2 -d /dev/lirc0 --driver default
Then, if everything works as expected, when you press a button on your remote, with it pointing towards the IR receiver, you should see something like this:
Congratulations! Now your IR receiver and your OS is working as expected. The only thing that’s left is to let your lircd service to recognize your remote controller.
LIRCD configuration
Now we are almost done. The only problem left is, you are using a random remote controller. The service lircd, which OSMC relies on, doesn’t know your remote controller. The good news is, you only need one program to help lircd recognize your remote controller. The bad news is, it is a tedious process. But probably because of its tediousness, the thrill you experience once it’s done, is stronger than usual. OK, let’s get it done.
The program you have to run is irrecord:
irrecord -d /dev/lirc0 -H default test.conf
Upon pressing enter, the program will give your detailed instructions on how to proceed. I understand that reading pages of text instruction is not for the faint of heard, so here’s what you are supposed to do in simple languages.
- Press Enter to tell the program you’ve done reading the instructions.
- Now the program will try to figure our some basic parameter of your remote controller. You are supposed to press buttons on the remote, at a rate of about 1 button per second. The program will print “.” if it detects something, and you are supposed to press as many buttons as you can, so that the program will print out at least 2 lines of “.”. When there is enough, the program will take you to the next step.
- When the program has learned enough of the basics of your remote, it will again give you some instructions, you are supposed to press “Enter” once you’ve done your reading.
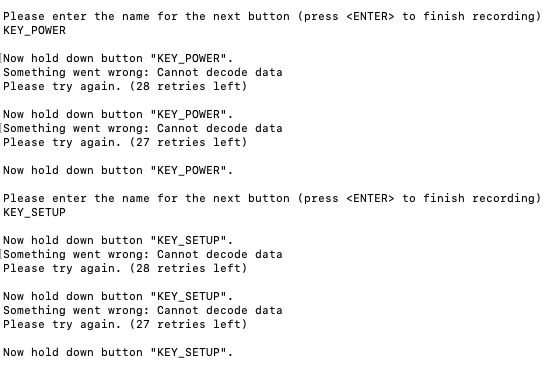
- Now you are ready to “record” your remote. You do it by repeating the following procedure: First, tell the program which button you are going to press, press “Enter”. Then, when the program is ready, press and hold the button on the remote till the program is ready for the next button. Here is a screenshot of me recording the remote:
You may wonder, how am I supposed to know what kind of buttons/keys are there? Don’t worry, run the following command to get a complete list of button/key names lircd service understands:
irrecord -l
Of course, the list is way too long for a standard remote. You don’t have to use all of them. I use an old Sharp TV remote for this purpose, so it has more than enough buttons to accommodate the following keys:
KEY_POWER
KEY_SETUP
KEY_PAGEUP
KEY_PAGEDOWN
KEY_MUTE
KEY_VOLUMEUP
KEY_VOLUMEDOWN
KEY_MENU
KEY_LEFT
KEY_RIGHT
KEY_UP
KEY_DOWN
KEY_OK
KEY_BACK
KEY_CANCEL
KEY_PLAY
KEY_STOP
KEY_PAUSE
KEY_FASTFORWARD
KEY_FASTREVERSE
Once you’ve done all the keys, just press “Enter” on the next prompt and the program will write everything into test.conf as you specified.
Now, you just have to tell OSMC to use this config file. In OSMC, go to “My OSMC, Remotes”, as shown in the below screenshots.

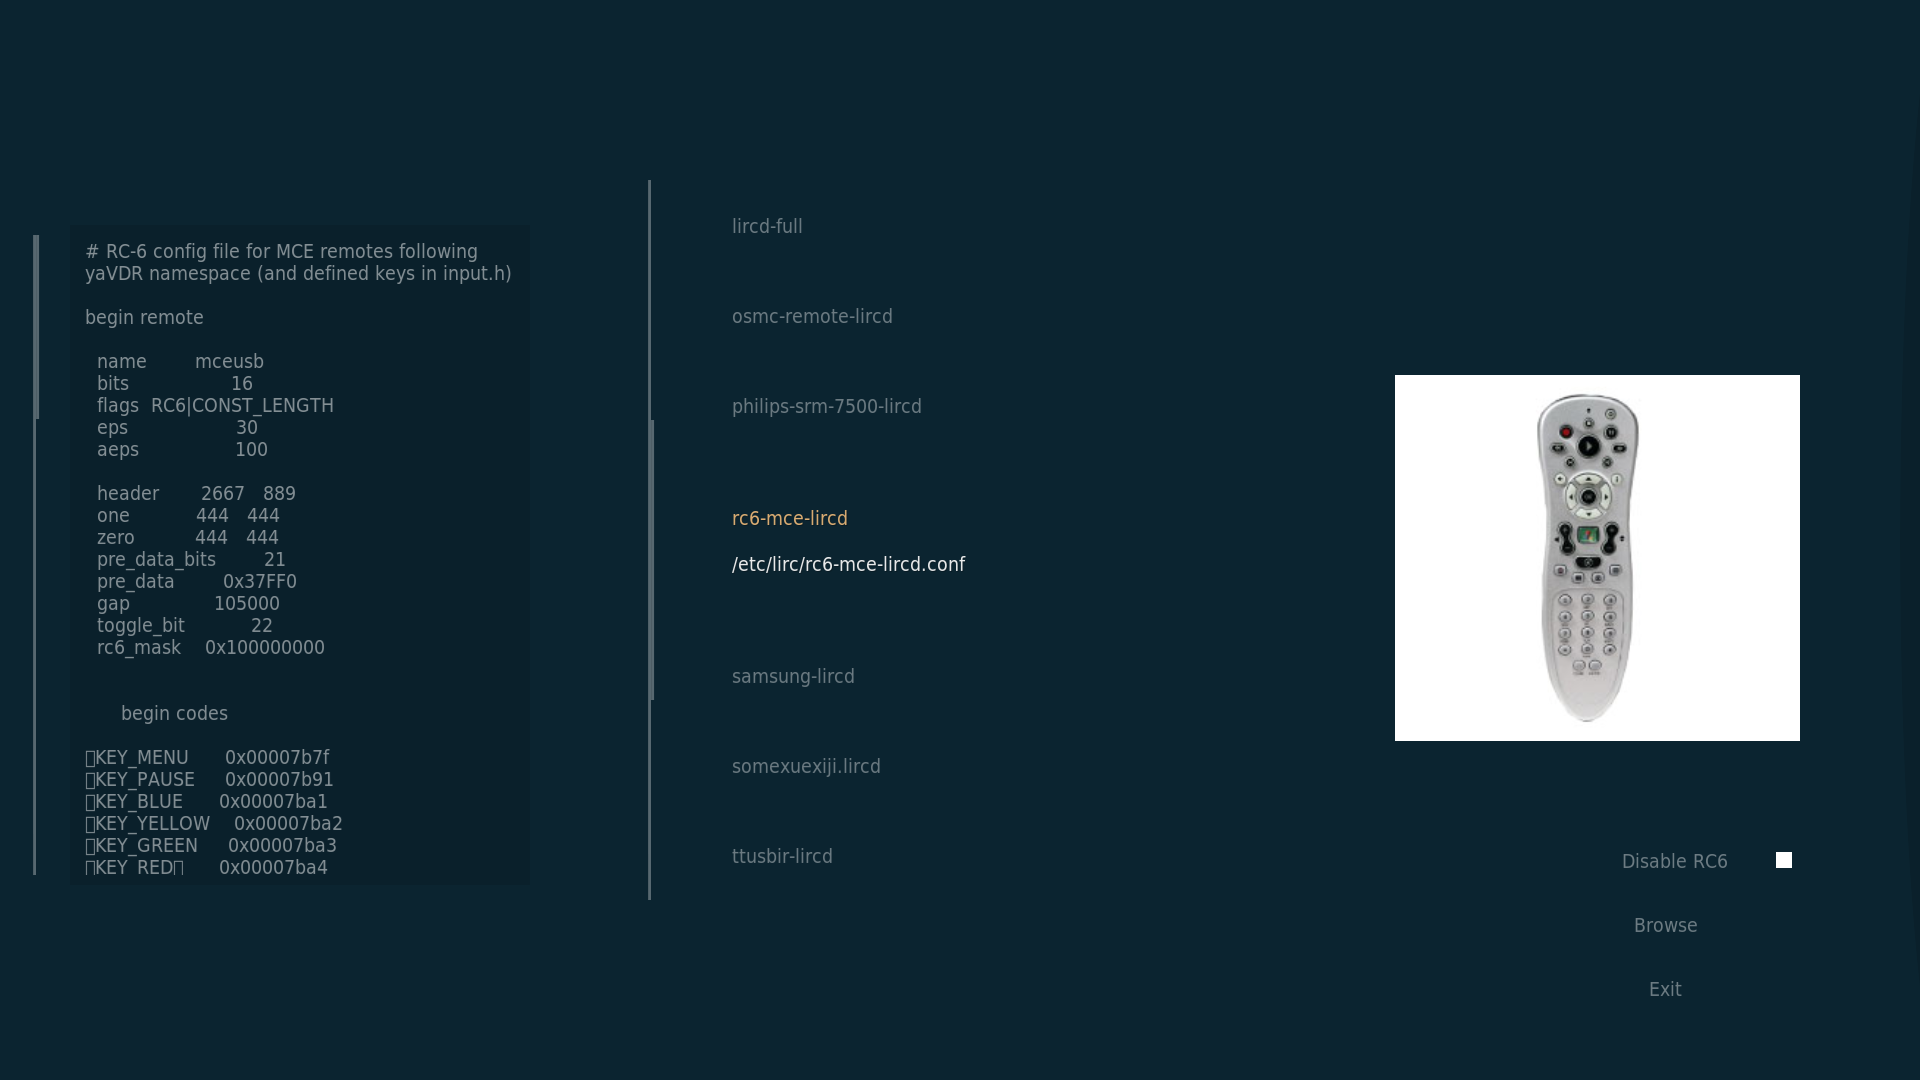
Click the “Browse” button close to the bottom right part of screen to choose the file generated by irrecord (test.conf), the system will copy the config from test.conf to its default config file.
That’s it. Confirm the change, reboot your Raspberry Pi and enjoy a media center with remote.
If you run into problems, you might want to check the following section.
Pitfalls and Caveats
The key checkpoint in the whole process is the mode2 command.
If you don’t see output when you press the buttons on the remote while running mode2, you might want to double check the following points:
- IR receiver is correctly connected; (GPIO18 is pin number 12)
- GPIO pin is correct configured on /boot/config.txt (or in OSMC using GUI);
- Service lircd is stopped before you run mode2;
- You’re using the correct device file (/dev/lirc0 in my case) and correct driver (default driver in my case).
If mode2 runs correctly but your remote doesn’t work, you might want to check the following points:
- Use the correct driver in irrecord command;
- When irrecord is learning the basic parameters of your remote, be extra careful at pressing buttons. You want irrecord to print dots for each button you press, and you don’t want irrecord to print too many dots (more than 10 dots) for a single button.
- Some remotes just don’t work with irrecord, especially some remote for air conditioners. You may have to get a different remote.
That is all I can say about getting a remote for OSMC media center on Raspberry Pi. Good luck!